5 Simple Steps To Livestream Your Event Online For Free
Do you want to host an event with thousands of potential attendees, but with absolutely no outlay? Livestreaming on YouTube is your answer.
YouTube Live Events offers two options for livestreaming your event; Quick and Custom. Quick allows you to broadcast live to the world, using only your computer and webcam and takes only a few minutes to set up – that’s what we’re going to look at today.
Getting started with YouTube livestreaming
1) Meet eligibility requirements
- To be eligible to livestream your event, your YouTube account must be verified (via phone call or SMS) and in good standing – meaning you haven’t breached community or copyright guidelines. You can check this in the ‘Status and Features’ section of your YouTube channel.
- For the Quick option you also need to link your Google+ profile or page to your YouTube channel.
- Finally, you must also enable your YouTube channel for live events (do this in the ‘Status and Features’ section). Once your channel is enabled for live events, you’ll see a ‘Live Events’ option in your Video Manager.
2) Set up your event
Navigate to ‘Live Events’ in Video Manager and select ‘Create live event’.
On the ‘Info and Settings’ page complete the ‘Basic Info’:
- Enter a title for your event, description and keyword tags. Make your description clear and specific, explaining the content of the event, but try to make it punchy and interesting, too – it needs to stand out!
- Schedule the date and start and end times of your event.
- Select a security setting for your event. Choose ‘Public’ to make your event available to everyone or ‘Private’ to choose who can join. You can invite guests by adding their names, email addresses or the Google+ Circles they belong to. You can also choose ‘Unlisted’ to have a public event that won’t be publicly promoted on Google+.
- Under ‘Type’ select ‘Quick’ (this option is also known as a Hangout on Air)
3) Select customisation options
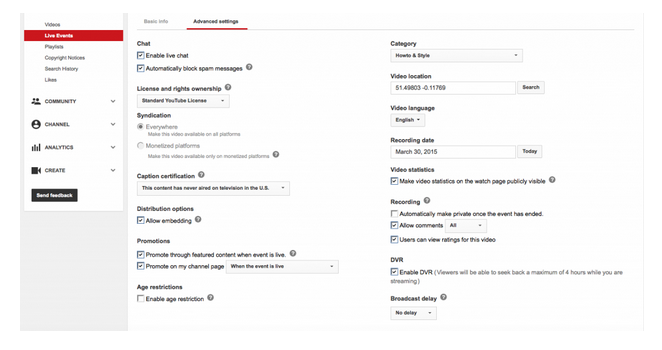
Now complete the ‘Advanced settings’:
- YouTube Live Events gives you the option of a live chat facility, enabling viewers to ask questions and interact with you in real time. Make sure you have this enabled. You will be able to moderate the comments as they come in.
- Select the most relevant category for your event – this is an important part of its description and will help potential attendees find you.
- Make selections for your recording preferences. When the broadcast of your event is over, it will be automatically posted to your YouTube channel as well as your Google+ home page. From there you can edit it, and the edited version will be available to anyone you share it with.
• Click the ‘Create event’ button. The event will now appear in the ‘Live Events’ section of your Video Manager.
4) Run an off-air demo
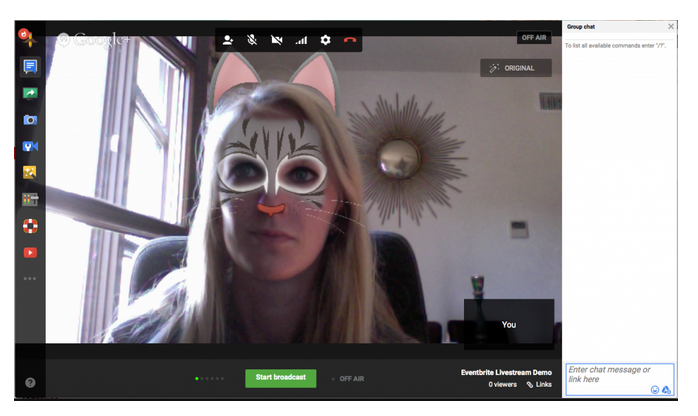
- You can launch a demo by selecting ‘Start Hangout on Air’. This will prompt you to download the Hangouts plugin and enable security settings in your browser.
- Once you have completed this, the Hangout on Air window will open and your webcam will launch.
- You will notice numerous options down the left hand side, allowing you to control chat, share your screen, capture a photo, invite and manage event participants, add special effects (I opted for a cat disguise!) and share YouTube videos.
- To the bottom right of the screen you can see how many viewers you have.
- You can use the demo to test your microphone, camera and bandwidth are all up to the job.
5) Go Live!
When it’s time for your event to start simply select ‘Start broadcast’ and you’re good to go!
Conclusion
It couldn’t be easier to start broadcasting to the world! YouTube’s ‘Hangout on Air’ option is ideal for discussions, webinars and performances. With a well-placed webcam, you could also broadcast sessions or keynotes from a live event, enabling people to attend virtually.
For more advanced broadcasting check out the ‘Custom’ option, where you can control your event production and manage your own encoding settings using your preferred platform.


